
1. 지역 변수, 범위, 지속 기간
지역 변수
범위(scope): 어디서 사용할 수 있고, 없는가
지속기간(duration): 메모리를 반납
보통 함께 묶어서 생각하는 것이 일반적이나 동적 할당을 할 때는 범위와 지속기간이 분리된다.
#include <iostream>
namespace work1 {
namespace work11 {
namespace work111 {
int a = 1;
void doSomething()
{
a += 3;
}
}
}
int a = 1;
void doSomething()
{
a += 3;
}
}
//namespace work1::work11::work112 {
// 컴파일러 17버전부터 가능하나 적게 들어가는 것이 좋다
//}
namespace work2{
int a = 1;
void doSomething()
{
a += 5;
}
}
int main()
{
using namespace std;
//apple = 0; error!!
int apple = 5;
cout << apple << endl;
{
// 더 작은 블럭에 같은 이름의 변수(line 15)가 선언될 경우,
// 큰 단위의 변수(line 9)를 숨긴다. 가급적으로 이름을 다르게 짓자!
int apple = 1; // duration: 블럭 안, 상단 apple과는 다름
cout << apple << endl;
}
cout << apple << endl;
// :: scope resolution operator
work1::a;
work1::doSomething();
work2::a;
work2::doSomething();
return 0;
}
//apple = 3; error! 중괄호 범위 밖
2. 전역 변수, 정적 변수, 내부 연결, 외부 연결
전역 변수(Global Variable): 어디서든 사용할 수 있는, 가급적 사용 X... 부득이하게 사용해야 할 상황이 온다.
정적 변수(Static Variable)
내부 연결(Internal Linkage): 이 파일 내에서는 어디서든 사용할 수 있다.
외부 연결(External Linkage): 한 cpp 파일에서 선언한 함수를 다른 cpp 파일에서도 직접 사용이 가능하다.
내부 연결과 외부 연결의 차이: 여러 cpp 파일에 흩어져서 정의돼 있는 변수들을 링킹하며 파일들 간의 연결 관계를 만들어 줄 것이냐, 아니냐
#include <iostream>
using namespace std;
int g_a = 1;
int value = 123;
// static duration variable 정적 지속 변수, 디버깅 및 테스팅용
// 변수 a가 OS로부터 받은 메모리가 static임, 메모리가 정적으로 선언된다
void doSomething()
{
//int a = 1; // 함수 선언 시 계속해서 할당받고 반납함
//static int a = 1; // 할당받은 메모리를 계속해서 사용, 초기화는 한 번만! 따라서 초기화는 필수적임
++g_a;
cout << g_a << endl;
}
int main()
{
// 전역 변수 123 출력
cout << value << endl;
int value = 1; // local variable, 블럭을 벗어나면 메모리 반환
// 지역 변수 1 출력
cout << value << endl;
// global scope operator, 전역 변수 연산자
cout << ::value << endl;
doSomething(); // 2
doSomething(); // 3
doSomething(); // 4
doSomething(); // 5
return 0;
}전역 vs 스태틱: 스태틱 변수는 어딘가에 정적으로 주소가 저장돼 있겠지만 다른 곳에서 직접적으로 접근할 수가 없음
링킹 단계에서 local variable은 밖으로 나올 일이 없음
#pragma once
// 헤더파일에서는 선언만, 초기화는 MyConstants.cpp에
namespace Constants
{
extern const double pi;
extern const double gravity;
// ...
}namespace Constants
{
extern const double pi(3.141592);
extern const double gravity(9.8);
// ...
}#include <iostream>
#include "MyConstants.h"
extern int a = 123;
void doSomething()
{
using namespace std;
cout << "In test.cpp " << Constants::pi << " " << &Constants::pi << endl;
}#include <iostream>
#include "MyConstants.h"
using namespace std;
// static - 다른 cpp에서 접근 불가능!
//static int g_a = 1;
// forward declaration, (extern) void
void doSomething();
extern int a;
/*
int g_x; // external linkage
static int g_x; // internal linkage, 다른 파일에서 접근 불가능
const int g_x; // X, const는 초기화를 동시에 해 줘야 함
extern int g_z;
extern const int g_x; // extern은 const 가능, 한 군데서 초기화를 해 줘야 함
int g_y(1);
static int g_y(1);
const int g_y(1); // 같은 파일 안에서만 접근 가능
extern int g_w(1);
extern const int g_w(1); // 상수, 초기화O, 외부 접근 가능
전역변수
기본적으로 internal linkage, 정의가 된 파일 내에서 사용될 경우 편하게 지역변수처럼 사용
프로그램이 복잡해지면 어디서 수정했는지 확인하기가 어렵기 때문에 단점이 많음
여러 개의 cpp 파일이 공통적으로 사용할 수 있는 전역변수, external linkage
static 정적 지속 변수, static duration variable
*/
int main()
{
// test.cpp의 constants::pi와 메모리 주소가 다름!! 메모리 낭비
cout << "In main.cpp file " << Constants::pi << " " << &Constants::pi << endl;
doSomething();
return 0;
}
3. Using문과 모호성
동일한 이름을 가진 변수, 함수를 사용할 수밖에 없는 경우가 생긴다. 다른 클래스, 다른 네임스페이스 등 이름이 겹치는 경우가 많이 발생한다. 오버로딩, 오버라이딩을 권장하는 경우도 있다.
모호성(Ambiguity): 컴파일러가 어떤 걸 사용해야 하는지 모름
using: 모호성을 해결하기 위해 컴파일러에게 이것을 사용하라고 제시함
#include <iostream>
namespace a
{
int my_var(10);
int my_a(123);
}
namespace b
{
int my_var(20);
int my_b(456);
}
int main()
{
//std::cout std::endl을 줄여 쓰기 위함
// using namespace는 사용 취소 방법이 없기 때문에 블록으로 싸 주는 것이 좋음
using namespace std;
/*using std::cout;
using std::endl;*/
cout << "Hello " << endl;
using namespace a;
using namespace b;
// "my_var" is ambiguous!
//cout << my_var << endl;
cout << a::my_var << endl;
cout << b::my_var << endl;
cout << my_a << endl;
cout << my_b << endl;
// 블럭으로 싸 주는 방법도 있음!
/*{
using namespace a;
cout << my_var << endl;
}
{
using namespace b;
cout << my_var << endl;
}*/
return 0;
}
4. auto 키워드와 자료형 추론
큰 프로그램을 작성할 때는 많은 변수를 사용하게 된다. 매번 수동으로 결정한다면 프로그래밍 효율이 떨어질 수밖에 없다.
#include <iostream>
// 매개변수에는 auto 불가능! => template
auto add(int x, int y) -> int // 코드 정리 시 보기 좋음, trailing return type
{
return x + y;
}
int main()
{
using namespace std;
int a = 123; // 중복된 정보: 123(정수), int(정수형)
auto b = 123; // 당연한 얘기지만 초기화를 꼭 해야 한다!
auto d = 123.0;
auto c = 1 + 2.0;
auto result = add(1, 2);
return 0;
}
5. 형변환 Type conversion
#include <iostream>
#include <typeinfo>
#include <iomanip>
int main()
{
using namespace std;
int a = 123;
int b = 123.0; // 경고는 뜨나, 컴파일 가능함
int bb = (int)123.0; // 명시적 형변환
// 어떠한 data type인지 출력, auto와 형변환에서 유용하게 사용
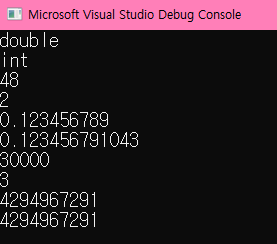
cout << typeid(4.0).name() << endl;
cout << typeid(a).name() << endl;
// numeric promotion: 작은 것 -> 큰 것, 큰 문제가 없음
float f = 1.0f;
double d = f;
// numeric conversion(변환)
double d2 = 3;
short s = 2;
int i = 30000;
char c = i; // char 범위에 안 들어감
int i2 = 2;
char c2 = i2; // char 범위에 들어가기 때문에 문제 없음
// char로 출력하면 문자로 출력되기 때문에 명시적 형변환 필요
cout << static_cast<int>(c) << endl; // 출력: 48
cout << static_cast<int>(c2) << endl; // 출력: 2
double d3 = 0.123456789;
float f2 = d3; // 정밀도가 부족해서 완벽하게 출력하지는 못함
cout << std::setprecision(12) << d3 << endl; // 출력: 0.123456789
cout << std::setprecision(12) << f2 << endl; // 출력: 0.123456791043
int i3 = 1234;
float f3 = i;
cout << std::setprecision(12) << f3 << endl; // 출력: 1234.0
float f4 = 3.14;
int i4 = f4; // 소수점 "버림" / 반올림, 올림, 버림의 함수는 따로 있음
cout << i4 << endl; // 출력: 3
// unsigned <-> signed는 문제가 생길 수 있으니 조심히 다뤄야 함
cout << 5u - 10 << endl;
cout << 5u - 10u << endl;
// 우선순위: int < unsigned int < long < unsigned long <
// long long < unsigned long long < float < double < long double
// 암시적 형변환
int x = (int)4.0; // c style
int y = int(4.0); // cpp style, int 타입의 instance를 만들어 넣음
int z = static_cast<int>(4.0); // 최근
return 0;
}
6. 문자열 std string 소개
C에서는 배열을 이용해서 문자열 표현, 여기서는 string class 사용법을 다룸
#include <iostream>
#include <string>
#include <limits>
int main()
{
using namespace std;
// 기본적으로 한 글자를 여러 개 나열하는 방식으로 문자열을 사용함
// string은 프로그래머의 편리를 위해 구현함, 사용자 정의 자료형(기본형은 아님)
const char my_strs [] = "Hello, World";
const string my_hello = "Hello, World"; // (), {}도 가능
// "" 안에 있는 것은 문자열, char[13] 맨 뒤에 끝을 알리는 문자가 있음
cout << "Hello, World" << endl;
cout << my_hello << endl;
// 정수는 문자열로 암시적 형변환 불가능! 문자열 저장 시 따옴표 필수(연산 불가능)
string my_ID = "123";
// cin으로 name을 입력받을 때, 중간에 space가 들어가면 다음 입력(age)을 받지 않고 버퍼에서 불러옴
// getline: line 단위(enter를 칠 때까지) 입력받음!
cout << "Your name ? : ";
string name;
//cin >> name;
std::getline(std::cin, name);
cout << "Your age ? : ";
string age;
//cin >> age;
std::getline(std::cin, age);
cout << name << " " << age << endl;
// 정수와 문자열을 같이 입력받기
cout << "Your age ? : ";
int age2;
cin >> age2;
//std::getline(std::cin, age2);
// '\n'을 만날 때까지 최대 32767(2byte, signed 최대값)의 글자를 무시해라
//std::cin.ignore(32767, '\n');
std::cin.ignore(std::numeric_limits<std::streamsize>::max(), '\n');
cout << "Your name ? : ";
string name2;
//cin >> name2;
std::getline(std::cin, name2);
cout << name2 << " " << age2 << endl;
// 문자열 더하기
// string 사용 시, 문자열을 더할 수 있음(append)
string a("Hello, ");
string b("World ");
string hw = a + b;
hw += "I'm good";
cout << hw << ", " << hw.length() << endl;
return 0;
}
7. 열거형 enumerated types
비슷한 유형의 다양한 옵션들을 기호적으로 표현하기 위해 사용함
헤더에 넣고 include 하는 방식으로 주로 사용!
#include <iostream>
#include <string>
// 피해치를 얼마나 줘야 하는지...
int computeDamage(int weapon_id)
{
if (weapon_id == 0) // sword
{
return 1;
}
if (weapon_id == 1) // hammer
{
return 2;
}
// ...
}
enum Color // user-defined data types
{
COLOR_BLACK = -3, // 수동으로 값을 할당할 수 있고, 자동으로 다음 값도 할당됨
COLOR_RED, // -2
COLOR_BLUE = 5,
COLOR_GREEN = 5, // 수동으로 같은 값을 할당할 수 있으나 구분되지 않으므로 권장X
COLOR_SKYBLUE, // 마지막에 콜론 붙여도 상관없음!
BLUE
};
enum Feeling
{
HAPPY,
JOY,
TIRED,
//BLUE error!! 'BLUE': redefinition; previous definition was 'enumerator'
};
int main()
{
using namespace std;
Color paint = COLOR_BLACK;
Color house(COLOR_BLUE);
Color apple{ COLOR_RED }; // 주의할 필요가 있음 => class 초기화에서..
Color my_color = COLOR_BLACK;
cout << my_color << " " << COLOR_BLACK << endl;
if (COLOR_BLUE == COLOR_GREEN)
{
cout << "Equal" << endl;
}
int color_id = COLOR_BLACK; // OK
Color my_id = static_cast<Color>(3); // OK
//Color my_id = 3; error! integer를 넣을 수 없음
//cin >> my_id; error!
int in_number;
cin >> in_number;
if (in_number == 0) my_color = COLOR_BLACK;
// ...
string str_input;
std::getline(cin, str_input);
// 권장 X, 오타 낼 경우...
if (str_input == "COLOR_BLACK")
my_color = static_cast<Color>(0);
return 0;
}
8. 영역 제한 열거형 (열거형 클래스)
Scoped Enumerations(Enum class)
#include <iostream>
int main()
{
using namespace std;
/*
enum Color
{
RED,
BLUE
};
*/
enum class Color
{
RED,
BLUE
};
/*enum Fruit
{
BANANA,
APPLE
};*/
enum class Fruit
{
BANANA,
APPLE
};
Color color = Color::RED;
Color color2 = Color::RED;
Fruit fruit = Fruit::BANANA;
/*
비교(color == fruit) 불가능
if (color == fruit)
cout << "Color is fruit ? " << endl;
*/
// 같은 것들끼리는 비교 가능
if (color == color2)
cout << "Same color" << endl;
return 0;
}
9. 자료형에게 가명 붙여주기
Type aliases
긴 것을 짧게 줄여서 편하게 사용할 수 있음, 읽기 편함, 유지보수, 플랫폼에 독립적인 코딩
#include <iostream>
#include <vector>
#include <cstdint>
int main()
{
using namespace std;
typedef double distance_t;
std::int8_t i(97); // 고정너비 정수에서도 상황에 적합한 이름을 만들어 준 것임
// 컴파일러 입장에서는 같음, 프로그래밍 편의를 위함
double my_distance;
distance_t home2work;
distance_t home2school;
// 복잡한 자료형이 존재할 수 있음
vector<pair<string, int> > pairlist1;
vector<pair<string, int> > pairlist2;
typedef vector<pair<string, int> > pairlist_t;
pairlist_t pairlist3;
using pairlist_t2 = vector<pair<string, int> >;
pairlist_t2 pairlist4;
return 0;
}
구조체 struct
class를 이해하기 위해 중요함
#include <iostream>
#include <string>
using namespace std;
/*
매개변수를 다 넣기에는 너무 힘듦
void printPerson(double height, float weight, int age, string name)
{
}
*/
struct Person
{
// member, 기본값을 넣을 수 있음
double height;
float weight;
int age;
string name = "Mr. Incredible";
// 구조체에 속해 있는 함수
void print()
{
cout << height << " " << weight << " " << age << " " << name;
cout << endl;
}
};
struct Family
{
Person me, mom, dad;
};
struct Employee // 2 + (2) + 4 + 8 = 16 padding
{
short id; // 2 bytes
int age; // 4 bytes
double wage; // 8 bytes
};
// return도 가능
Person getMe()
{
Person me{ 2.0, 100.0, 20,"Jack Jack" };
return me;
}
int main()
{
// 여러 명을 저장하려면 힘듦
double height1, height2, height3; // double height1[100];
float weight;
int age;
string name;
Person me{ 2.0, 100.0, 20, "Jack Jack" };
/*me.age = 20;
me.name = "Jack Jack";
me.height = 2.0;
me.weight = 100.0;*/
Person mom;
Person dad;
// 구조체 안에 있는 것에 접근하려면 "."(member access operator)
me.weight;
me.print();
Person me2(me);
me2.print();
// 대입 연산자가 내가 의도한 대로 작동되지 않을 수 있으니 주의!
Person me3;
me3 = me;
me3.print();
Person me_from_func = getMe();
me_from_func.print();
Employee emp1;
cout << sizeof(Employee) << endl; // 출력: 16
return 0;
}
해당 포스트는 '홍정모의 따라하며 배우는 C++' 강의를 수강하며 개인 백업용으로 메모하였습니다.
인프런: https://www.inflearn.com/course/following-c-plus
홍정모의 따라하며 배우는 C++ - 인프런
만약 C++를 쉽게 배울 수 있다면 배우지 않을 이유가 있을까요? 성공한 프로그래머로써의 경력을 꿈꾸지만 지금은 당장 하루하루 마음이 초조할 뿐인 입문자 분들을 돕기 위해 친절하고 자세하게 설명해드리는 강의입니다. 초보로 시작하더라도 중급을 넘어 고급 프로그래머로 가는 길목에 들어서고 싶으시다면 최고의 디딤돌이 되어드리겠습니다. 여러분의 꿈을 응원합니다! 초급 프로그래밍 언어 C++ 온라인 강의 C++
www.inflearn.com